Shop Products
Houzz Logo Print
shelleyuk

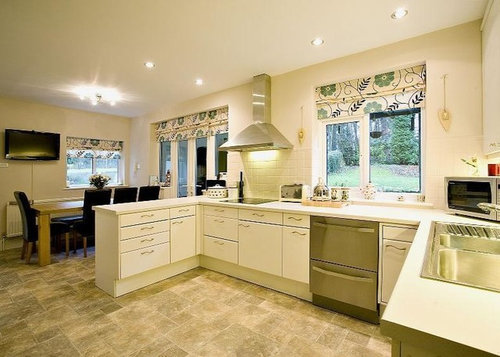
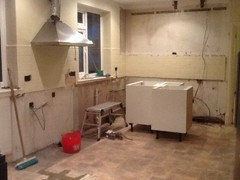
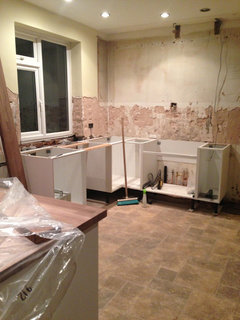
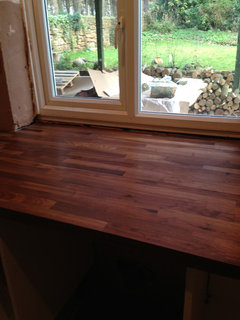
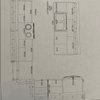
Please help with kitchen decisions!!

shelleyuk
10 years ago
After a leak and an insurance claim we have the go ahead to order new flooring for the dining room and kitchen. I have attached a picture of the current kitchen (although that's not my table and chairs).

The kitchen is a pogenpohl kitchen and was probably expensive twenty years at but it is literally on its last legs now. The worksurface is grey laminate stained and horrible.

This is the flooring going in (walnut) and it will go right through to the dining room (and if I can twist my husbands arm it might also run through to the den.). This will mean altering the kick boards since we currently have vinyl on the floor and the depth will be different.

We hadn't planned on doing the kitchen immediately since we would like one day to extend so that the back wall where the cooker hood is will move outwards and the kitchen will be twice the size. However we live in a conservation area where that might never be possible and actually we don't have the funds at the moment. So we are wondering about a cheap(ish) update to the kitchen. That way if we ever do extend we won't feel like we've wasted a fortune on the kitchen.

We have to order the flooring quickly due to the way in which the floor is being paid for by the company that caused the damage. This means the side panels and kickbacks need to come off the current kitchen. This in turn means I need to make fairly quick decisions.

I'm considering ikea ramsjo since its cheap and wooden (meaning we can buy additional doors in the future if we needed to). Any thoughts on how to make it look more expensive? How easy is it to fit a kitchen, would we be able to do any of it ourselves to keep cost down? Any tips? Thoughts on sink style? Tap style? All help appreciated!

Comments (160)

  • PRO
    OnePlan
    9 years ago
    I've been very lucky and seen a couple of pics ! Trust me - it looks totally amazing !!! Hope Shelley posts some photos !!!
  • shelleyuk
    Original Author
    9 years ago

    Embarrassingly we still haven't put up the wallpaper and so there are no finished version pictures just yet but hopefully will get that done over the next few weeks.


    Here are a few update pictures though. This was the cleared "before" space

  • shelleyuk
    Original Author
    9 years ago

    Part way through - island gone and confused cats


  • shelleyuk
    Original Author
    9 years ago

    New units going in. We didn't change the floor plan much but we bought extra worktop space by making the peninsular slightly wider. It was two narrow width drawer units placed back to back.


  • shelleyuk
    Original Author
    9 years ago

    View from the other side. All the base units were drawer units and so we have gained lots of useable drawer space.


  • shelleyuk
    Original Author
    9 years ago

    units going onto the range/window wall. Apologies for photo fuzziness.


  • shelleyuk
    Original Author
    9 years ago

    Sink wall and a glimpse of the walnut worktop.


  • shelleyuk
    Original Author
    9 years ago

    Worktop was then fitted. We took out the window ledge and took the worktop all the way into the window space which has made a big difference.


  • shelleyuk
    Original Author
    9 years ago

    more worktops


  • shelleyuk
    Original Author
    9 years ago
    last modified: 9 years ago

    Flooring going down. This flooring runs into the laundry room and the children's TV room. New radiator can also be seen. There is underfloor heating underneath the floor (electric mats as secondary heating only). You can also see the new cupboards next to the door. We used wall units as base units to keep them narrow. They fit a cereal box which is handy.

  • shelleyuk
    Original Author
    9 years ago


    Wall units going in. We chose extra height units and hung them higher than you would normal hang wall units so that they reached the ceiling (gap was then filled later). This was partly so that I could have an enormous tap and partly because I liked the unit to ceiling look.

  • shelleyuk
    Original Author
    9 years ago

    New wider units surrounding the fridge. We wanted it to go floor to ceiling again but I also wanted appliance garages and so we stacked base units. Two base units stacked with a wall unit on top.

  • shelleyuk
    Original Author
    9 years ago

    Will post more later. Have to fetch a sick child from school!

  • shelleyuk
    Original Author
    9 years ago

    OK I'm back with sick child dosed up and settled in front of the tv. This shows the wall of floor to ceiling units prior to the doors going on.


  • shelleyuk
    Original Author
    9 years ago


    Sink and tap installed and some doors going on.

  • shelleyuk
    Original Author
    9 years ago

    Range installed and drawers going in

  • shelleyuk
    Original Author
    9 years ago


    More drawers in!

  • shelleyuk
    Original Author
    9 years ago

    Building up the floor to ceiling units and the handles on. We went for stainless steel cup handles on all drawers and glass knobs on all cupboards

  • shelleyuk
    Original Author
    9 years ago


    under and in cabinet lighting going in

  • shelleyuk
    Original Author
    9 years ago


    starting on the carrara marble splashback

  • shelleyuk
    Original Author
    9 years ago


    More marble and the new led spotlights. This also shows the edging on the wall cabinets (although the wires are still needing to be secured on the under cabinet led lights).

  • shelleyuk
    Original Author
    9 years ago


    Everything hidden away in the appliance garages, one either side of the fridge. Microwave, food mixer, toaster etc all live in the cupboards and never come out.

  • shelleyuk
    Original Author
    9 years ago


    Extractor fan fitted and walls have the first coat of soft grey,

  • shelleyuk
    Original Author
    9 years ago


    New pendants above the table (apologies for the mess in this photo, we'd had to move everything out of the utility room which we'd been using as a temporary kitchen so that they could fit the new units to that area - we were effectively camping in a half finished kitchen here). This is our very old oak kitchen table which we sanded and stained and then we painted the legs white.

  • shelleyuk
    Original Author
    9 years ago


    And this is the wallpaper that will eventually go up on this wall. The wallpaper will also be on the back of all of the glass wall units.


    And that's it so far! I will update (once the wallpaper is up) with some finished kitchen photos!

  • shelleyuk
    Original Author
    8 years ago

    Oops, I forgot the pimping!


    Feet for the cupboards and the moulding around the wall units


  • shelleyuk
    Original Author
    8 years ago
    And more pimping. Blackboard paint inside the doors. DS2 likes to add notes!
  • PRO
    OnePlan
    8 years ago
    Wow !! Great job !!!
    shelleyuk thanked OnePlan
  • Carolina
    8 years ago

    Lovely transformation already! Nice 'pimping' too. And I love the wallpaper you chose. Get it up on that wall girl! It will look fantastic :-)

  • lisamarie1000
    8 years ago
    Its looking great, where did you buy the kitchen units from in the end? Also how about the subway tiles? This looks very similar to a kitchen I have just put a deposit on...
  • shelleyuk
    Original Author
    8 years ago

    The units are Ikea Ramsjo in white. The tiles are from the Fired Earth East Hampton range. We did have a complete nightmare with the marble. Its a very soft stone and the edges have a tendency to chip. Lots of sanding and very careful selection/rejection of tiles was required.

  • Ashley Petsch
    8 years ago

    Do you have a full update with photos? Looks amazing!!

    shelleyuk thanked Ashley Petsch
  • shelleyuk
    Original Author
    8 years ago

    Final photos attached


  • shelleyuk
    Original Author
    8 years ago


  • shelleyuk
    Original Author
    8 years ago


  • Michelle Pat
    8 years ago

    Shelleyuk, where did you get that wallpaper? I've been looking for something like this for years! Thank you and - beautiful kitchen!!!

    shelleyuk thanked Michelle Pat
  • shelleyuk
    Original Author
    8 years ago

    Thank you. Its Thibaut Allison in grey.

  • Michelle Pat
    8 years ago

    Thanks for your reply. I like how you did the wallpaper on only one wall. May I ask the maker of your cabinets? Did you go with Ikea?

    shelleyuk thanked Michelle Pat
  • PRO
    Diespeker Terrazzo & Marble
    8 years ago

    How fun it's been reading through this restoration journey! You must be so pleased with the outcome. We particularly like the softness that the carrara marble tiles bring to the kitchen - the hues of grey and white really bring the kitchen together.

    shelleyuk thanked Diespeker Terrazzo & Marble
  • emmauk
    8 years ago
    It's beautiful and something like I want in mine eventually! Can I ask how you 'pimped' the feet and plinths and where the handles came from. I've read from the beginning but didn't see that info! Thanks
    shelleyuk thanked emmauk
  • shelleyuk
    Original Author
    8 years ago

    Hi everyone, I'm glad you like it!

    Yes the cupboards are ikea ramsjo. We were on a strict budget but I was trying to achieve a certain look as per my inspiration photo. We therefore used edging trim along the top and bottom of all the cabinets and painted this to match the cupboards. The wall cupboards are all hung higher than is the norm in the UK and this makes a big difference to the feeling of space in the room and allowed up to have ceiling height cupboards. Our kitchen fitter then cut very simple "feet" out of pine which were attached to the bottom of the trim and again painted to match the cupboards.

    The drawer handles are all cup handles in satin nickel. There are lots of different ones out there and mine were from finger tip design at £1.75 each. The cupboard knobs are handcut glass handles from Graham and Green. Very cheap again at only £4 per knob but I think they look expensive. We have lots and lots of drawers and a fair few cupboards so the handles needed to be cost effective.

    The marble carrara tiles are from fired earth (marble subway tiles were very difficult to find in the UK) and we had all sorts of trouble with them because of chips along the edges. However I have to say their customer service was second to none and we ended up getting the tiles more or less for free!


  • Michelle Pat
    8 years ago

    I've spent the last hour looking at your beautiful transformation. So I naturally have a few more questions that I hope you don't mind answering. Where did you get the walnut counters and flooring? You just bought the regular ikea cabinets and doors and your carpenter did the rest? Where you have the "legs", did the carpenter also make the moulding that sits on top of them? You did a really great job!

  • emmauk
    8 years ago
    Thanks for replying Shelley
  • Michelle Pat
    8 years ago

    Sorry, but I love your design...did you only do "feet" for the cabinets on either side of the fridge?

  • Mary D
    8 years ago
    I love the 3 pendant lights. Where can I get them?
  • shelleyuk
    Original Author
    8 years ago

    Hi, the feet are on all of the cabinets at the end of every run when we hit an appliance or just came to the end of the run. Some of the photos up thread were taken before the feet had been added since they were literally the last thing to go on.

    We actually used the ikea deco strip to create the moulding but we didn't use it the way Ikea anticipate. We fixed it sideways. It is supposed to be fixed the other way around but that look would have been too "modern" for this kitchen. If I was designing the kitchen again I wouldn't bother with the ikea deco strips and would have used pre cut wooden moulding and then painted it. This would have enabled me to have slightly deeper moulding at the ceiling line. At the time of ordering the kitchen I didn't know that we would find an exact paint match for the ramsjo range though.

    The wooden worktops were incredibly good value IMO. They are american black walnut (butcher block) and are from wood and beyond here


    worktops


    This thread doesn't show it but at the same time as doing the kitchen we did the adjoining snug and the large utility room. In the utility room I used the ikea walnut worktop which was ridiculously cheap because it's not solid walnut. There is no way you could ever know it isn't solid though unless you installed it. Its perfectly good.


    ikea karlby worktop


    The flooring is my big mistake with this kitchen. As the thread shows, this wasn't originally going to be a complete kitchen refit and it spiralled out of control somewhat. The flooring was being replaced due to a water leak and we went for laminate due to cost. Its from kaindl and as laminate goes its decent stuff with bevelled edges, narrow planks and texture matched finish BUT it was a mistake. It looks great and when you tell people its laminate they have to get down really close to tell but it damages very easily and is scratched, particularly underneath the kitchen table where the kids scrape the chairs in and out (even with felt pads on the feet). If you drop anything on it and it chips thats a problem. This wouldn't have been a problem with wood.

    I've never had laminate before and hadn't realised it would be this difficult to live with but I wouldn't do it again, I would bite the bullet and install the hardwood. The big benefit of the laminate was that we could have underfloor heating mats which are nice in the winter.


    The lighting is from Jim Lawrence. The style is called Ava. I love the lighting too and the shape of the glass echos the shapes in the wallpaper.


    pendant lights


    The kitchen table was our old ikea oak table which we'd had for ten years. we stained the top in dark walnut and painted the legs white to match the cabinetry.


    I haven't got a precise figure for everything but in total with the appliances and with the snug and also the large utility room included (which in itself has 14 cabinets) flooring and the decorating in each of those rooms and a hallway, plus new glazed doors through to the hallway and the dining room we spent about £15,000 (a big chunk of this on lovely ikea interest free credit though!). This includes all labour, fitter, plumber (we changed out two radiators for a nicer style), electrician, decorator. We could have saved further money by doing some of the installation ourselves and doing our own decorating (but then it would probably have resulted in selling the house due to divorce!)

  • Michelle Pat
    8 years ago

    You've been so helpful. Thanks and enjoy your beautiful kitchen!

  • PRO
    More Handles Ltd
    8 years ago

    Hi there, the other alternative is to have your surfaces and doors wrapped. There are some good places who do a professional job and make the kitchen look brand new for a fraction of the cost, and then of course update your kitchen cupboard handles etc and voilà a new kitchen in half the time and cost.

  • Marina
    8 years ago

    Really enjoyed this thread. I love the idea of papering inside the cupboards and the blackboard paint. Your kitchen looks amazing. What a stunning result!